
As mentioned in the introduction, I am a Senior Security Analyst in the Wordfence Security Services Team (SST). The SST is a group of security analysts responsible for cleaning compromised websites and performing security audits on WordPress websites. Wordfence already leads the WordPress security space and is increasingly establishing itself as world-class experts in website security in general. Members of the SST have access to a variety of tools developed in-house, as well as information and people, in order to help in ensuring a clean WordPress site at the end of the process.
The following is a description of the process followed by members of the team when carrying out these services.
1. The Four Goals When Investigating a Hacked Site
- Generate samples of the site HTML (the HTML that the site is serving to the web browser) that contains malicious code. This is required to help develop signatures for the Web Application Firewall, keeping it up to date with the latest attacks.
- Get samples of the malicious source code from the server. These may be PHP files or JavaScript, HTML, CSS and even image files that contain PHP source. These sample are also submitted to the Threat Intelligence database.
- Determine how the attacker gained access. Log files are analysed, along with any malware found to help determine the intrusion vector . This is added to the report that is provided to the customer, helping to prevent the issue from recurring.
- Provide the customer with a clean WordPress site and also to secure the site. Remove any malware found, including removing code from infected files and SQL injections from the database.
Omega is Wordfence’s site clean-up toolkit. Temporary virtual servers are created (using Amazon Web Services Elastic Compute Cloud) and copies of the customers infected files are transferred to them. Omega is then used to perform the clean-up on the replica files, before the cleaned files are uploaded back to the customer’s hosting account. Omega is written in PHP and designed to be used through the browser.
2. Review of the Live Site
- If the site is doing anything bad, this behaviour is captured. If malicious code is found or malicious behaviour is observed, the page source (or relevant JavaScript files, etc.) is saved and submitted as a sample to the Threat Intelligence database.
- Any existing problems such as error messages or incorrect formatting is recorded. This is partly to ensure that once the clean has been completed, there is no possibility that issues can be blamed on the site cleaning process.
- Further to this, the site should be checked and possibly screenshots taken to ensure that nothing is broken as a part of the clean-up process.
It makes sense for this to be carried out in a sandboxed Virtual Machine, to avoid any chance of the computer being used by the analyst becoming infected.
3. Checking of Settings and Assorted Potential Issues
A triage script along with manual checks is used to check all of the following if possible:
- Cron jobs
- Log retention settings
- cPanel-specific items
- “lastlogin” list
- cPanel file manager upload history
- SSH keys installed in the .ssh directory
- Presence of .my.cnf file in user’s home directory
- File protection feature enabled or disabled
- Appropriate ownership/permissions on home directory and public_html
4. Acquisition of Forensic Data
The following is generated or downloaded for analysis:
- File metadata snapshot.
- HTTP access logs (Some servers have no log rotation. This is sometimes enabled as part of the process).
- FTP logs.
- Host-specific forensic data: Some hosts for example will provide a malware.txt file with the results of a clamAV scan.
5. Acquiring Files
Customers will usually provide their hosting control panel credentials, along with FTP credentials and the WordPress admin credentials. Control panels like cPanel give the ability to create an archive (tar or zip) of the site files from a file manager. The files can then be downloaded over FTP or SFTP to the Omega instance for analysis. The company follows GDPR guidelines in doing this, and offers the customer a Data Processing Agreement should this be required.
6. Acquiring the Database
It is first necessary to identify the database used by the customer’s WordPress installation, which can be determined from the wp-config.php file. Tools like phpMyAdmin in the hosting control panel, or Adminer (a single PHP script that allows for the administration of MySQL databases), to export the customer’s database and download it to Omega. This is essential in providing the customer with a clean WordPress site.
7. Cleaning and Omega Investigation
As mentioned, Omega is the main tool used to locate and remove malware and look for forensic evidence.
Although hacked websites are generally a badly preserved “crime scene”, they do provide many potential sources of forensic data. As many of these as possible can be used in order to find proof of the attack vector, or to establish one or more best guesses based on the available evidence.
8. Possible Sources of Forensic Data
According to Lazzez and Slimani, the primary aim of Web Application Forensics is to trace a security attack on a web application back to the perpetrator who carried out the cybercrime (A. Lazzez, 2015). From the perspective of Wordfence, attributing responsibility to specific criminals is not the primary goal. The aim is to determine how the infection occurred and to prevent it from happening again.
The following are potential sources of forensic data that should be investigated:
- Malware content – Current trends from what is observed during site cleaning or from items reported by the rest of the site cleaning team often help point toward an attack vector. For example, if hackers are using hijacked administrator accounts to install a malicious redirect to eviljavascript.com, and this redirect is found in the customers site it is worth checking to see if there is evidence of a hijacked administrator account. This can also apply to file names, e.g. if a hacker group is leaving a signature file behind.
- Location of malware – Some exploits leave malware in very specific places (for example, in /wp-content/plugins/revslider/temp/update_extract). Malware in a WordPress theme can indicate the use of a hijacked administrator account. It is often worth checking log files for requests to the theme editor. The malware found may also point to a broad class of exploit, for example altered items in the wp_options table. This may indicate the use of an exploit that only allows the attacker to set WordPress options. File names may also give you a clue, such as GravityForms exploit files having _input_ in their names.
- File timestamps – Timestamps are far from perfect due to their ability to be manipulated, but they can still be very helpful in setting the direction of an investigation. For example, checking the timestamp of the first malicious or infected file and then using this as a starting point in HTTP access log analysis, if available.
- Logs – HTTP access logs, FTP logs, and PHP error logs can all provide vital forensic data.
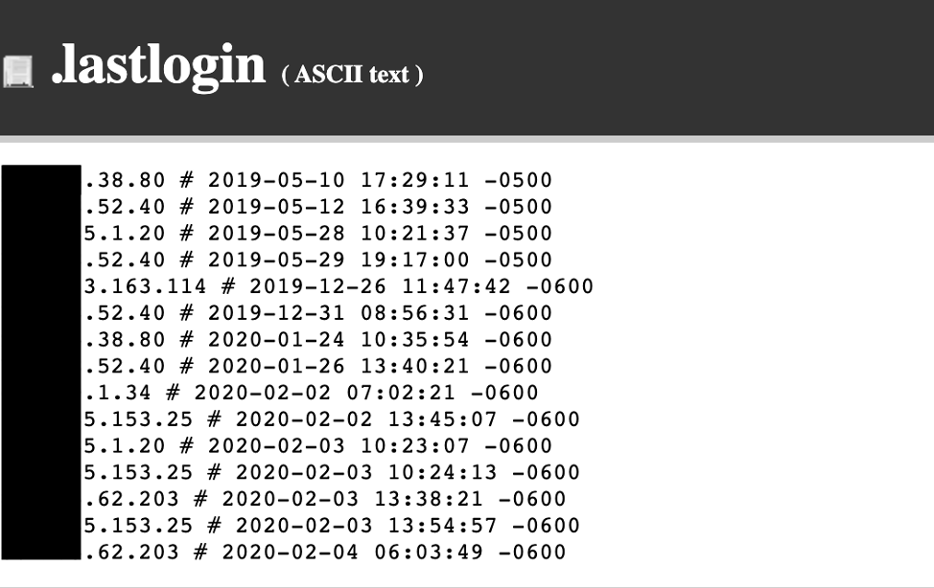
- Host-specific artefacts – For example cPanel file upload logs or lastlogin files, bash history files, Plesk access logs. Occasionally root access is available which can provide access to additional log files from services like audit that can help with the investigation. Figures 5.1 and 5.2 below shows the location of the .lastlogin file on a control panel and an example of its contents. It shows the IP address and times of users that have previously logged into that account. Geolocation information of the IP address can be checked to determine whether the cPanel account might have been compromised.
- Database artefacts – Sometimes records created by Wordfence or other plugins that can show illegitimate administrator logins or other hacker activity.
- Site backups – If automatic backups are in place they can sometimes be used to get a better idea when the site was hacked and what versions of applications or plugins were running at that time.
Figure 5.1 – .lastlogin file in a cPanel account filesystem

Figure 5.2 – Sample contents of a .lastlogin file (IP addresses partially redacted)
The files and database are cleaned on the Wordfence Omega servers before uploading the clean WordPress site files and database back to the live server.
File analysis involves a number of manual and automated processes. Files are scanned using Omega based on the signatures that are developed by the team for use in the Wordfence plugin. This also includes scanning using signatures that are currently in development, so sometimes produce false positives. Files are also scanned with heuristic signatures, looking for specific patterns. It is then necessary for the analyst carrying out the clean to use their expertise to manually look for any malware that has not been picked up by the automated scans. Malware is then submitted to the Defiant Threat Intelligence (DTI) database and any malware not picked up by existing signatures have signatures developed for them.
Figure 5.3 – Example of an obfuscated include often seen in infected WordPress files, with de-obfuscated code below
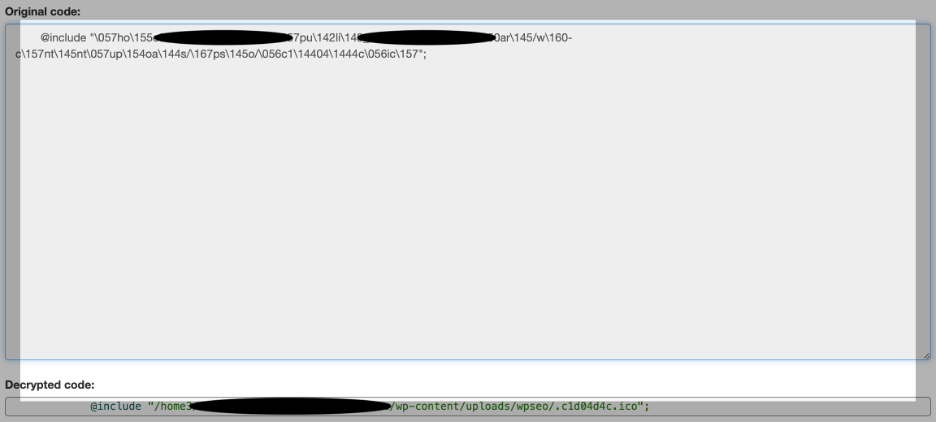
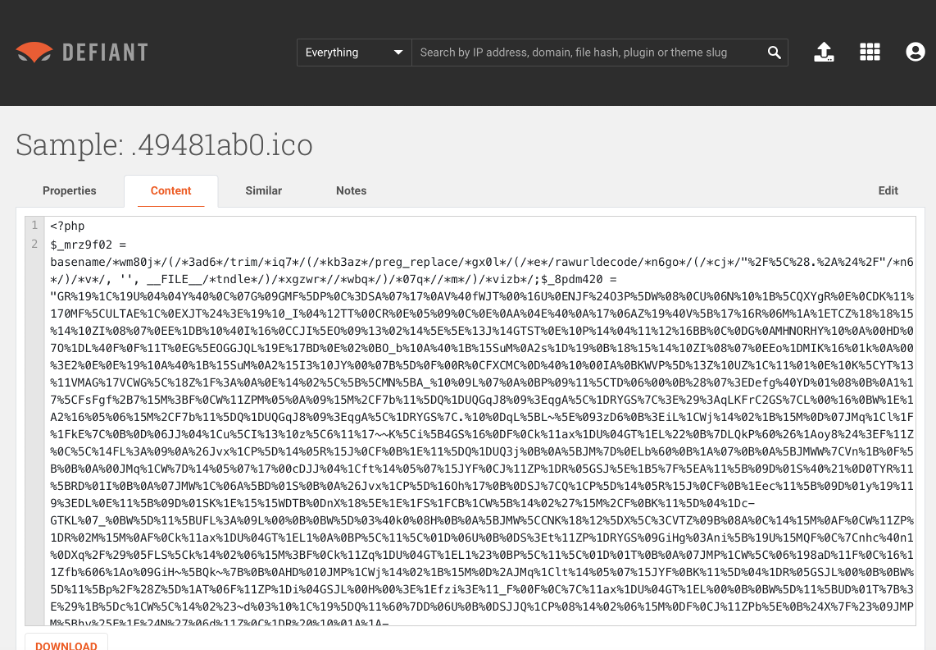
Figure 5.4 – Example contents of malicious .ico file
Database analysis is carried out on SQL dumps of the database, with any changes then made on the live server. This is sometimes done by creating a new database instance and importing the cleaned SQL into that database before setting the clean WordPress site to use this new database instance. When cleaning a WordPress database, the most commonly infected tables are wp_options and wp_posts. There are a number of specific strings that are checked for that relate to typical database infections. This includes looking for any <script> tags present in the database and confirming that they are legitimate. Other strings that relate to spam infections would include strings like pharma, viagra, essay and jersey.
Figure 5.5 – Example of malicious scripts injected into WordPress _posts database table (domain partially redacted)

Once the clean WordPress site is back online, there are a number of steps that must be completed. These include:
Removal from blacklists – If the site is on any blacklists, any steps necessary to remove it are carried out.
Change passwords – If there is any indication that a compromised password was, or could have been, the attack vector, the relevant passwords are changed.
Report Generation – The report is completed containing details of any intrusion vector found and steps the customer needs to take to ensure that the site remains clean.
Submission of malware samples – Submit samples to Defiant Threat Intelligence (DTI) database. This allows signatures to be generated that are used by the plugin to prevent other sites from becoming infected.
Back to Part 4 – OWASP Top 10 Vulnerabilities Affecting WordPress Applications